Saturday, April 9, 2011

Bumble Bee Birthday Cake

My daughter wanted a bumble bee birthday party, complete with the bee hive cake. After spending a lot of time on line checking out ideas, here's what I ultimately came up with.
I used two cake mixes - yellow and chocolate and reserved about 1/2 c. of each, then added the yellow to the chocolate, and the chocolate to the yellow and swirled it to create a marbled effect.  
I baked the cakes in 3 separate pans/dishes.  
For the base I used a glass pyrex bowl.  For the next layer, I used a cake mold I've had for several years.  You know, the doll or princess cake mold that makes the skirt, and you slip the doll top into...I just covered the hole at the base with parchment paper.  The top layer was a pyrex like small dish that I use to serve salsa or sour cream etc. in...all greased and floured liberally.  
I baked the smallest bowl for about 40 minutes and the larger ones for an hour.  After they'd cooled for 10 minutes, I removed them from the pans and let them cool completely.  
I ended up slicing the second layer in half (where it coned the most) and used it for a higher layer.  I assembled it all using a butter cream frosting.  
(And yes - this photo is sideways - I don't know why, and I don't know how to fix it.  I had other photos here, and they all 'broke') But, you get the picture. 


One of the ideas I found online suggested heating or melting my frosting (I just used a yellow buttercream - about 3 cups) and pouring it over the cake.  While it was a little weird, that's what I ended up doing.  At first, I thought it was a little gloppy (could've been too hot?) but it poured right over, but wasn't smooth or even, and left a few holes as it dripped down.  I decided a real beehive isn't truly symmetrical and perfect, and really liked the effect.

I placed it in the fridge and let it set.  The frosting actually became quite hard, and the flavor changed - it became yummier!

As the cake cooled, I went to work on the little bumblebees.  I'd seen several ideas online, but was still waiting for my inspiration.  I decided to use almonds and cover them with chocolate.  Just as I was ready to melt the chocolate, I had found my inspiration.  Instead of brown with yellow strips, I decided to go the other way.
I melted white chocolate bark and colored it yellow.  Then I dipped roasted almonds into the chocolate, and the placed them on parchment paper to dry.
I melted semi-sweet chocolate chips and drew stripes on each bee, and added yellow and white gumdrop slices for wings (I preferred the yellow in the end because the white looked too much like houseflies) - the chocolate stripes easily secured the wings.
I piped 2 white dots for eyes using royal frosting, and then added pupils with a toothpick and melted chocolate.  Really, they were super cute little guys, and really fun to make.  They reminded me of sesame street characters with their googly eyes.


And yes, some turned out better than others.  I was able to re-adjust them knocking off extra bits after it had dried.  
Today I affixed the bumblebees to the cake.  While I started out using royal frosting, I found that melted chocolate seems to glue things better in this case.
As a final touch, I added a few daisies.
The best part of all was that the cake was super cute, and tasted great too!


Friday, April 8, 2011

Ice Cream Tacos


Ice Cream Tacos??!!
I know - it just doesn't sound very appetizing - What a weird combination...
Although it doesn't sound great, we found this recipe many years ago in a 'Kid's Cookbook' by Pillsbury.  This is the second time we've taken these babies to school for a birthday treat and the kids were fascinated by the unusual prospect, and loved them.  As odd as the idea seems, the corn tortilla offsets the sweet ice cream, adding a delightful salty flavor as well as a fantastic crunch.

We made these the first couple of times strictly using chocolate chips for the chocolate part, but then I started using crushed up almond brittle, instead of the peanuts, and we REALLY love it this way.  Here's a link to the almond brittle. The almond brittle uses butterscotch chips which add a profound depth that satisfies without overpowering the chocolate.  Finally, this is a really fun kid friendly recipe - nothing too complicated for a kid.   Of course double or triple or quadruple this recipe as needed.   

 8 taco shells 
1/3 cup almond brittle, crushed
1/4 c. chocolate chips 
2 cups ice cream (any flavor)

 Heat oven to 350 degrees. 
Stand taco shells up in baking dish/pan. If needed, crumple up pieces of foil into balls, and stick them in pan to prop up taco shells. 
Heat taco shells for 5 minutes or until they are crisp and look light golden-brown. (If freezing these for a longer period of time or over-night, bake for 8-10 minutes to help retain crispness).  

Remove from oven, and let taco shells cool in pan for 10 minutes or until they aren't warm when you touch them. Leave taco shells in pan. 

Measure out almond brittle. Spoon 1 teaspoon into bottom of each taco shell. Reserve extra for later.  

Melt chocolate chips and spoon  into a small sandwich size plastic bag and set aside for a moment.   

Measure out 1/4 cup of ice cream. Carefully spoon 1/4 c. ice cream into each taco shell.  Sprinkle remaining brittle liberally over taco shells.

Snip a very small opening in the corner of the plastic bag of melted chocolate and drizzle chocolate over taco shells decoratively.  

Cover with foil and freeze for at least 15 minutes prior to serving. 


Monday, March 28, 2011

Faux buffalo hot wings

I wish my wings had looked like this: 

They didn't.  But, they tasted almost like it (except for the deep fried crunchy skin, and little bitty bones).   I fell in love with wings a couple of years ago when a JR Crickets opened near our home.  I was then devastated when they went out of business because I couldn't single handedly keep them in business - I tried though, I really did! 

I've been in wing mourning ever since. 

We were craving wings last weekend, and I decided to see what I could come up with.  Unfortunately, since I so rarely make wings, the wings in my freezer were old, gross, and frostbitten.  But we wanted wings!  
I decided to improvise and came up with a healthy 'ish' alternative.  Faux wings.  Here's the recipe - which I mostly snagged from Frank's Hot Sauce web page...I just changed the meat medium. 
(My camera is sort of on the fritz right now, so I only got the photo of the un-cooked faux wings)

Cut 7 -10 boneless, skinless chicken thighs into wing sized chunks and place on a foil lined pan on the bottom rack of an oven - preheated to 500* (that's not a typo)
Bake for 15-20 minutes, then remove and turn over once.
Bake for an additional 15-20 more minutes until thoroughly cooked.
Place in a bowl and toss to coat with Frank's Buffalo Hot Sauce.
Adjust amount according to taste.
Serve with chunky bleu cheese dressing (homemade is best)

At my old wing place mild, medium, & hot were solely determined by the amount of hot sauce added.


Monday, March 21, 2011

Heaven in a 11 x 15 or Chocolate Drop Cookie Bars or Chocolate Oatmeal Bars

I originally received this recipe from a friend of a friend... however, when I went to the blogpage to find the recipe again, it had mysteriously disappeared.

While disappointed about the disappearance, I was thrilled to find something very similar at Cooks.com. AND even better, I think that the following recipe may actually be BETTER than the original friend of a friend's recipe.

Chocolate Layer
1 c. chocolate chips
1 c. butterscotch chips
1 can sweetened condensed milk
1 tsp. salt
2 tbsp. butter

Cookie Layers
1 c. nuts
1 c. butter
2 c. brown sugar
2 eggs
2 tsp. vanilla
2 1/2 c. flour
1 tsp. salt
1 tsp. soda
3 c. oatmeal

Chocolate layer - on low heat, melt chips, milk, salt, butter.  Add nuts and set aside.
Cookie layer -
Cream butter and brown sugar.
Add eggs and vanilla and beat well.
Add flour, salt and soda.
Beat well and add oatmeal.
Spread 3/4 of batter in a 10 x 15 inch pan that has been sprayed with cooking spray or greased.
Spread chocolate mixture over cookie layer.
Drop remaining batter by teaspoonfuls on top.
Bake at 350 degrees for approximately 30 minutes (high altitude), or 30-45 minutes at sea level on a humid day. 

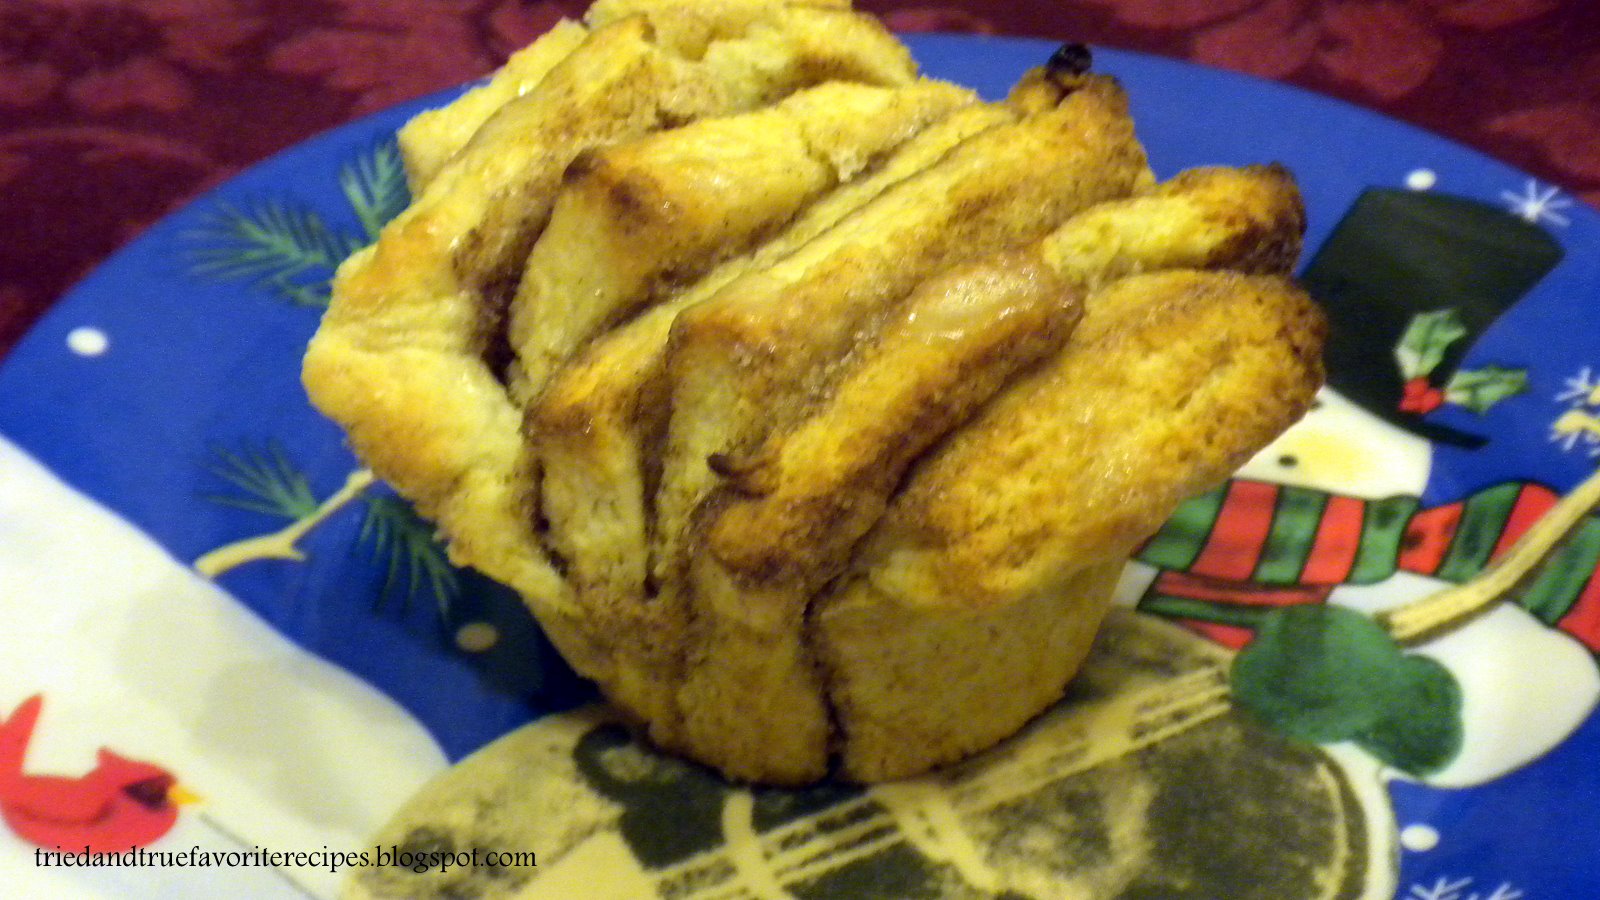
Cinnamon Biscuit Fans

As a wedding present, someone gave us a Betty Crocker's 'Best of Baking' cookbook.  At first, I was a little perturbed thinking - 'man, they think I don't know how to cook'.  However, over the years, I've grown very grateful for the fantastic recipes I've found in this cookbook.  
The following recipe is a classic that I come back to again and again.  This is a hybrid between a baking powder biscuit, and a cinnamon roll...not quite either, but a nice mix between.  Start to finish, this recipe takes me approx. 30 minutes - including the 16-18 minutes of baking.  This is also a great one to make with kids!


Mix flour, sugar, baking powder and salt together in a small bowl


Cut in butter, then add enough milk (about 3/4 cups) so that dough leaves side of bowl and forms a ball.
Turn dough onto slightly floured surface.  Gently roll in flour to coat.  Knead lightly 10 times. 


Roll into 12" x 10" rectangle.
Spread softened butter over rectangle.
Sprinkle with cinnamon - sugar.


Slice rectangle crosswise into strips - approx. 10"x2".
Stack strips starting from the middle, then alternating from each side, moving outwards.
Cut stack crosswise into 8-10 pieces.


Place cut sides up in greased muffin/cupcake pans.
Bake 16-18 minutes or until golden brown. 
Immediately remove from pan. 


Drizzle glaze (recipe below) over warm biscuits.

Cinnamon Biscuit Fans
1/3 c. firm margarine or butter
2 c. all purpose flour
2 T. sugar
1 T. baking powder
1/2 t. salt
Approx. 3/4 c. milk

Filling: 
3 T margarine or butter, softened
3 T. sugar
1 t. ground cinnamon

Glaze:
1/2 c. powdered sugar
2 - 2 1/2 t. milk


Heat oven to 425*.  Grease/spray 8 - 10 medium muffin cups.  
Mix dry ingredients, and cut 1/3 cup butter in using pastry blender (or 2 forks) until mixture resembles fine crumbs. 
Stir in just enough milk so dough leaves side of bowl and forms a ball. 

Turn dough on to lightly floured surface; gently roll in flour to coat.  Knead lightly 10 times.  Roll into a rectangle, 12" x 10".  Spread 3 T. softened butter over rectangle.  Mix sugar and cinnamon, and sprinkle over dough. 
Cut crosswise into 10" x 2" strips.
Stack strips starting with the longest one in the middle.  Then alternately from the middle, stack each side strip.  
Cut crosswise into 8 - 10 pieces. 
Place cut sides up in muffin cups. 

Bake 16-18 minutes or until golden brown. 
immediately remove from pan.
Drizzle glaze over warm biscuits. 

Glaze: 
1/2 c. powdered sugar
2 to 2 1/2 t. milk

Mix ingredients until smooth and of drizzling consistency.  


Posted by Picasa

Thursday, March 17, 2011

Chicken Tortilla Soup 2


I try to make my weekly or monthly menu in advance - then each week I can just see what I'll need to shop for, and I shop accordingly.  It saves lots of money and time in that I don't have to go to the store very often, and if I do see something on sale that I'll be needing later in the month, I can stock up in advance.  If I'm not around, my husband can also consult the menu and begin cooking - knowing that everything is on hand.  (While it sounds like I'm really organized, don't be fooled) 

Tuesday around 4:00 pm I glanced at my menu and saw that I should be making Chicken Tortilla Soup.  I must have had a cookbook in hand when I put that on the menu since I've never made it before.  I decided to check out some on-line recipes and found this one at the Pioneer Woman's blog.  She's got some great recipes, and I love her photos.  
The down-side was that this took more than 30 minutes to prepare, and I hadn't realized the time requirements.  As such, I got to try this out the next day. 
One of my kids commented "it was better than I expected" (she doesn't like latin, or tex mexi types of foods) so this was high praise (I'll take it where ever I can get it - praise that is).  The rest of us loved it, and it was definitely worth the time it took to make.  Here's the recipe with a few adaptations.
This recipes works great with a crock pot.   


Heat oven to 375* degrees F.
Cut 3 whole boneless, skinless chicken breasts into smaller chunks (3"x2" maybe)
Drizzle both sides of chicken with 1 T. olive oil.
Combine 1 1/2 t. cumin, 1 t. chili powder, 1/2 t. garlic powder & 1/2 t. salt
Sprinkle spices mixture over chicken (both sides) and place in oven dish.
Save remaining spice mixture.
Cover chicken with foil and bake for 20 minutes.
Remove foil and bake for an additional 20 minutes, or until chicken is no longer pink. 


While the chicken bakes, dice the following:
1 c. onion, 1/2 -1 c. red, green or yellow bell pepper (or any combination thereof), 3 garlic cloves

Sauté diced vegetables in 1 T.olive oil over high heat.


Add any remaining spice mix (from the chicken). 
Stir to combine, then add 1 quart bottled tomatoes & juices
 (OR 1 (10 oz. can) Rotel Tomatoes & Green Chiles), 
32 oz. Low Sodium Chicken Stock,
1 quart (4 c.) hot water,
2 (15 oz. cans) black beans, drained,
1/4 - 1/2 c. chopped green chilies (if not using Rotel).  

Note - 3 T. tomato paste may be added to this mixture if desired. 

Bring to a boil, then reduce heat to a simmer, and allow to simmer uncovered for 45 minutes. 

Once chicken is done baking, shred using two forks, and add to simmering mixture.  


Mix 3 T. cornmeal or Masa (corn tortilla flour found in the flour section at most grocery stores, or in the mexican food aisles) with 1/3 c. water (more or less as needed) until it reaches a very thick liquid state, then mix into the soup.  


Continue to simmer for an additional 30 minutes.
OR place in crockpot on low and allow to simmer as needed.  
Check seasonings, adding more if needed, and be sure not to under salt.  

Remove from heat, and allow to sit for 15 - 20 minutes before serving.
5 minutes prior to serving, slice 5-8 corn tortillas into strips and gently stir into soup.  

Serve topped with sour cream, key limes, diced red onion, diced avocado, grated cheese, fried tortilla strips, and pico de gallo (equal amounts of chopped tomatoes, onions, cilantro, mixed with key lime juice, and seasoned with cumin and salt)


Heat oven to 375* degrees F.
3 whole boneless, skinless chicken breasts cut into smaller chunks (3"x2" maybe)
(Rotisserie/deli chicken can be used to speed up the time requirements)
1 T. olive oil.
1 1/2 t. cumin, 1 t. chili powder, 1/2 t. garlic powder & 1/2 t. salt
1 c. onion, 1/2 -1 c. red, green or yellow bell pepper (or any combination thereof), 3 garlic cloves - diced
1 quart tomatoes OR 1 (10 oz. can) Rotel tomatoes with Green chiles
1/4 - 1/2 c. chopped green chiles (if Rotel is not used)
2 (15 oz.) cans Black beans, drained
32 oz. chicken stock/broth
4 c. hot water
3 T. cornmeal or masa corn tortilla  mix
5-8 whole corn tortillas, cut into strips

Toppings
Sour Cream 
Avocado
Red Onion
Pico de gallo
Grated cheese
Key Lime (to juice over soup)
Cilantro
Tomatoes
Tortilla Strips


Drizzle olive oil over both sides of chicken, and sprinkle with spices. 
Place in a baking dish. Save remaining spice mixture.Cover chicken with foil and bake for 20 minutes.
Remove foil and bake for an additional 20 minutes, or until chicken is no longer pink. 
While the chicken bakes, dice the vegetables, then sauté in olive oil over high heat.  
Add tomatoes/Rotel, chicken broth, water, black beans, green chilies. 
Bring to a boil, then simmer for 45 minutes, uncovered. 

When chicken is thoroughly cooked, shred with a fork and add to the soup mixture. 
Add masa/cornmeal to 1/3 c. water and mix until a thick liquid forms, then mix in to soup.  
Continue to cook for 30 more minutes, or place in a crock pot on low for several hours. 

Remove from heat 15-20 minutes before serving. 
5 minutes before serving add corn tortilla strips

Top with desired toppings. 

Saturday, March 12, 2011

Frosting, Frosting, Frosting

I spent the day in the kitchen with my kids today. We watched several tutorials this morning before we got started and found some super cute cup-cake and cake frosting ideas.

This flower is made by cutting mini-marshmallows on the diagonal, dipping the cut side into colored sugar, and building them into a base on the cupcake.
This sunflower is made by frosting the cupcake with a green frosting base, then topping it with an oreo, then building a flower around it, and accenting it with a m&m candy ladybug.

This cake has a buttercream frosting, and is decorated with flowers we made from Royal Icing earlier in the day.


Here are the frosting recipes we used and liked

Royal Icing
2 T. fresh lemon juice
2 eggwhites
4 c. powdered (confectioner's) sugar

Combine egg whites and lemon juice in mixer.  Slowly add powdered sugar - adjusting amount depending on stiffness desired.


Decorator's Butter Cream frosting
1/2 c. vegetable shortening
1/2 c. butter (1 stick)
4 c. powdered (confectioner's) sugar
2 T. milk
1 t. vanilla

Cream shortening and butter together.  Mix in vanilla.  Slowly add in powdered sugar, then add milk or additional powdered sugar as needed.


Posted by Picasa

Tuesday, March 8, 2011

Banana Cream Pie

I found it!  A really super amazing recipe for banana cream pie.  My quest has now officially ended.  It just disappears so quickly.  We've shared this with many neighbors and friends who have loved it - and some have even licked the pan clean. 


Filling:


  • 3/4 cup white sugar
  • 1/3 cup corn starch
  • 1/4 teaspoon salt
  • 2 cups milk
  • 3 egg yolks, beaten
  • 2 tablespoons butter
  • 1 1/4 teaspoons vanilla extract
  • 1 (9 inch) pie crust, baked
  • 4 bananas, sliced

Directions

  1. In a saucepan, combine the sugar, corn starch, and salt. Add milk in gradually while stirring gently. Cook over medium heat, stirring constantly, until the mixture is bubbly. Keep stirring and cook for about 2 more minutes, and then remove from the burner.
  2. Stir a small quantity of the hot mixture into the beaten egg yolks, and immediately add egg yolk mixture to the rest of the hot mixture. Cook for 2 more minutes; remember to keep stirring. Remove the mixture from the stove, and add butter and vanilla. Stir until the whole thing has a smooth consistency.
  3. Place a layer of sliced bananas into the cooled baked pastry shell. Top with a portion of the pudding mixture and then another layer (or two) of bananas and pudding. 
  4. Chill for an hour.
  5. Top with whipping cream  or meringue* if desired.

Notes: 

Here's a link to my favorite pie crust recipe.  It really makes a flaky heavenly crust.
I bake the crust at 375* for approx. 20 minutes.  I make sure to prick the crust prior to baking it, and I lay a sheet of waxed paper in the bottom and fill it with either dried beans, or utensils to keep it from puffing.  Puffy pie crust is zero fun. 


*Meringue:
Egg whites can be saved and instead of topping this with whipping cream, a meringue can be made with the egg whites, a pinch of cream of tartar and 2 T. sugar.  Beat egg whites and cream of tartar until soft peaks form, slowly add sugar, and beat until stiff peaks form.   Spread over pie and bake at 325* for 20-30 minutes until meringue sets.  Chill

Hot Fudge Bars or Heaven in a 9 x 13

My mom used to make these when I was a kid.  Then several years ago, my friend Liz introduced me to them again.  Liz  moved, and I couldn't find the recipe again. Tonight I was searching for a pie recipe, but came across these and realized that they were that elusive, yet decadent fudgey bar that I love.!  I made a few minor  changes, and here's my recipe.  Be warned - a little goes a long way!


Hot Fudge Bars
Cookie Dough
Mix the following ingredients into a stiff dough.
1 c. butter
1 c. white sugar
1 c. brown sugar
2 eggs
1 tsp. salt
2 ½ c. flour
3 c. oats
1 tsp. baking soda

Spray a cookie sheet or 9x13 with cooking spray and press 2/3 of the dough into the pan.

In a microwave bowl, melt the following:
12 oz. pkg. milk chocolate chips
1 can condensed milk
3 Tbsp. butter

Add:
2 tsp. vanilla
1 c. chopped nuts (optional)

Spread chocolate mixture over top of dough in pan. Crumble the remainer of the dough over the chocolate mixture.

Bake at 350* for 30 minutes.
Cool before cutting
Posted by Picasa

Sunday, February 20, 2011

Nutella Meringues

Last week I stumbled upon one of my friends who works at my kid's school. I often find her during her lunchbreak catching up on all of the blogs that she enjoys following. She had just printed up this recipe she came across, and offered me a copy.

 I originally discovered meringues in a little French restaurant 13 years ago and fell in love with them.  Despite automatically making a mental connection with lemon pie at the mention of meringue, these meringue cookies are made with the same ingredients for a meringue pie, however, the meringue is cooked until it reaches a hard and crunchy state.   These are light and airy (very much so), and crunchy on the outside with just a tiny bit of chewiness on the inside. They are gluten free, and very easy to make. My kind of mix'em, put'em in the oven and forget about them type of easiness...


3 large egg whites at room temperature
1/4 t. cream of tartar
1/4 t. salt
1/2 c. + 1 T. granulated sugar
1/4 Nutella hazlenut spread - most grocery stores carry this near their peanut butter section

Preheat oven to 300*F, and place one oven rack in the bottom 1/3 of oven, and another in the upper 1/3 of oven.

Line two baking sheets with parchment paper and set aside.

Using either a double boiler (or a microwave on half power stirring frequently) to melt Nutella, then set aside to cool.

Using a mixer, beat egg whites until completely foamy.
Add cream of tartar and salt, and continue to mix until soft-peaks form.

Increase mixer speed, and add sugar 1 tablespoon at a time.
Continue to beat on high until the meringue reaches hard peak consistency.

With a rubber spatula, gently fold the Nutella into the meringue three or four times. Avoid over mising as variegated and swirled effect is desired. Over mixing may also deflate the meringue.

Using two spoons, drop the meringue onto the parchment - lined baking sheets in large dallops.

Place in oven for 10 minutes.
After 20 minutes, lower the heat to 200*F, and rotate trays. Bake for 1 hour and 20 minutes.

Meringues should be completely dry, and will sound hollow tapped on the bottom after they cool.

Yield 15-25 meringues depending on size
Posted by Picasa

Monday, January 24, 2011

Flaky Baking Powder Biscuits

I decided to make my family some baking powder biscuits for breakfast this morning. I did a quick internet search and looked over several different recipes. This one came from the Food Network. I didn't have the luxury of time, so I made a few alterations and used my mixer.  My kids LOVED the results.
This works so well in a Bosch mixer - I can't say enough good about mine. The original recipe is made by hand, but a mixer makes these so much quicker, and the lid on my Bosch kept everything inside the bowl. If using a mixer, be very careful not to overmix as that will produce 'hockey pucks'. I understand that it is a 'gluten thing'.


2 c. flour
1 T. baking powder
1 t. sugar
1 t. salt
7 T cold unsalted butter, sliced
3/4 c. milk

Pre-heat oven to 450*, and place rack in the center of the oven.

Whisk flour, baking powder, sugar and salt in mixer until evenly combined.
Add butter slices and mix until butter slices are broken into small pea sized pieces.

Slowly add milk and mix (very briefly) until mixture makes a very loose dough.

Turn out onto a well floured surface, and pat into a 1/2 inch thick rectangle.
Fold the dough into thirds like a business letter (I totally skipped this part)
Pat into a 5x8 inch rectangle about 3/4 inch thick.
Use a 2-3 inch round cutter (or drinking glass top) to make 6 biscuits. Place them on prepared sheet. Press scraps of dough together and make 2-3 more biscuits, and place on baking sheet.

Bake until lightly browned - about 15 minutes.
Posted by Picasa

Tuesday, January 18, 2011

Trout - Fish Boil

I'm feeling a little frustrated with my photo software right now - I apologize for the really little picture...not quite sure what is going on.

My husband headed out ice fishing last weekend with some friends and came back with three 18+ inch rainbow trout.  I thought they were lake trout (since he caught them in a lake), but apparently not.

While my husband loves to fish, he doesn't care to eat them.  I eat them because - well, I'll eat about anything, they are good for you, and basically, they are free food if you can catch'em.  

I searched around today for a good trout recipe - I got several facebook responses and suggestions, but they all seemed to be the traditional 'lemon, butter, salt & grill'.

I stumbled across a trout recipe page (don't ask where, I doubt I could find it again).  One of their recipes was for a 'boil down'.  I  have never 'boiled down', and was a little dubious.  I did reduce the quantities, and we still had lots left over.  I changed a few things - their recipe called for 1 c. of salt...that seemed out of control to me, and I'm glad I changed it.  

My husband was amazed at how much he ate and commented on how 'unfishy' it actually tasted.  My kids ate a lot, and wanted seconds.  I enjoyed the mildness - it actually almost tasted like a corned beef with the vegetables and all.

1 Lake Trout cleaned, gutted, and gilled.  Chop into slices 2-3 inches wide
1 large onion - coarsely chopped
2 c. peeled baby carrots (or equivalent)
8 medium red potatoes.  Scrubbed and quartered, with peels left on
1 T. dill weed/seed
1-2 T. salt
1 stick melted butter

Wash trout, and scrub scales to remove fishy taste in cold water.

Bring large pot of water to a boil.
Add salt, dill weed/seed, potatoes and carrots.
Cover, and return to a boil.
Add onions
Cook for 20 minutes.
Add trout.
Cover and boil for 12 more minutes.

Fish will flake easily when it is done.  Do not overcook.
Remove from heat and drain.
Return to pot, or serving dish and pour melted butter over trout, potatoes, onion and carrots.
Be careful to remove bones as you eat.  

Serves 6-8

Note - I'm told that this traditional Fish boil is always served with cherry pie for dessert

Monday, January 3, 2011

7 Minute frosting without the double boiler

As a kid, I LOVED it when my mom frosted her cakes with 7 minute frosting...full of sweet marshmallowy goodness.
Most recipes for this frosting require beating the frosting over a double boiler for 7 minutes. Unfortunately, I have a Bosch mixer which won't let me do that.
This great little recipe still gives you that great taste and texture, without the double boiler.


2 egg whites
1 c. sugar
1/3 c. water
1/4 t. cream of tartar
1/8 t. salt
1 t. vanilla

In mixing bowl, beat egg whites until white and foamy. They should form a mound, but NOT peaks.

Set aside while preparing syrup.

In saucepan, combine sugar, water, and cream of tartar.  Bring to a boil and continue to cook and stir until the sugar is completely melted.

Turn on mixer and begin beating eggs whites again. Remove syrup from stove and in a thin steady stream, slowly pour into egg white mixture.

Continue beating until stiff peaks are formed.
Mix in vanilla.

Spread over cooled cake or cupcakes.
Posted by Picasa

Wednesday, December 22, 2010

Microwave Hard Candy

I found this recipe several years ago when I purchased some oil flavoring for candy making. This is SUCH an easy recipe. Three ingredients, a microwave, and about 8 minutes plus cooling time. That's it! My kids are begging to make more tomorrow.


1 c. granulated sugar
1/2 c. light corn syrup
1/2 dram (1/2 tsp) flavoring oil (or as desired)

Food color - optional
Powdered sugar - optional

Thoroughly mix sugar and corn syrup in a 4 cup microwave safe glass bowl or measuring cup.

Cover with plastic wrap.

Microwave on high for 3.10 minutes. Remove from microwave and carefully remove plastic wrap.
Quickly stir the sugar mixture and then cover with a NEW sheet of plastic wrap.

Microwave on high for 3.10 minutes. Remove from microwave and carefully remove plastic wrap and stir. (Use caution to avoid rising steam).
Stir in coloring and then flavoring.

Pour syrup quickly, but carefully, into lightly oiled lolipop molds, onto greased cookie sheet, or a cookie sheet covered with a layer of powdered sugar.

Just before candy has completely cooled, score or use large knife and cutting board to cut the candy into squares. OR wait until it has thoroughly cooled, and then simply break it into bite sized pieces.

Let candy cool until hardened. Do not put in refrigerator.

Dusting with powdered sugar keeps it from sticking.
Store in airtight container.
Posted by Picasa

Tuesday, December 21, 2010

Easy Fudge


As a kid, I was involved with a summer home economics entrepreneurial  program.  We made foods, and then tried to sell them. As we tried to brainstorm about what to make, one of the kids in our group suggested fudge.  I thought it was a marvelous idea - who doesn't love chocolate or fudge?  We stirred it and stirred it until the gloss lost it's luster, and set it out on paper plates for sale.

The whole class set up in front of the local KMART on a very hot summer morning.  Shortly thereafter, our fudge began to melt. I don't think we made a dime.  The kids next to us with the lame snow cone machine made a fortune though!

The moral of the story is that I've been afraid of fudge ever since.  No matter how easy people tell me it is, it never seems to be.

Things have finally changed.  This week I bought marshmallows (the cheap generic kind because they were on sale) to make rice krispy treats for my kid's class.  On the back of the marshmallow package, I found a recipe for 'Easy Fudge'.  So I figured I'd give it a try (I seem to try a new recipe at least once a year and am always disappointed) and enlisted my daughter's help.  It turned out great!

Hallelujah!  I've finally found a great fudge recipe that IS easy, and turns out great.  Thank heavens for recipes on generic marshmallow bags!

Here it is for any fudge challenged people out there (and my future posterity)

2 T. Butter
2/3 c. evaporated milk (5.33 oz)
1 3/4 c. sugar
1/4 t. salt (if using salted butter, I only add a couple of dashes of salt)
2 1/2 c. miniature marshmallows
1 1/2 c. semi-sweet chocolate chipes
1 c. chopped walnuts, or nuts
1 t. vanilla

Combine butter, milk, sugar and salt in medium saucepan; bring to boil over medium heat.

Boil for 4-5 minutes, stirring.
Remove from heat; stir in marshmallows, chocolate chips, nuts and vanilla.

Stir vigorously until chocolate chips and marshmallows are melted.

Pour into foil lined or buttered 8" square baking pan.
Sprinkle with additional nuts if desired.

Chill until firm.

Makes approx. 2 lbs