Recipe Index

Saturday, December 31, 2011

Bûche de Noël (Yuletide log) with Meringue Mushrooms

Happy New Years!  
I sat down this morning - ready to get working in the kitchen on my annual Yuletide Log, and almost felt betrayed that I've never posted this recipe.  It just doesn't seem possible since this is such a tradition for our family and friends on New Year's Eve. .
I found this many years ago in a Betty Crocker's Best of Baking cookbook someone gave us for our wedding.  We call it the log because it looks just like a tree stump, complete with little meringue mushrooms.  Keep in mind that it takes some time to put together.  
Bûche de Noël

The Log
3 eggs
1 c. sugar
1/3 c. water
1 t. vanilla
3/4 c. all purpose flour
1 t. baking powder
1/4 t. salt
1 c. heavy cream
2 T. sugar
1.5 t. cocoa powder
Chocolate Buttercream Frosting (below)
Meringue Mushrooms (below)

Heat oven to 375*.  Line jelly roll pan (15.5 x 10.5 x 1) with foil or waxed paper; grease.  Beat eggs in small bowl on high speed about 5 minutes or until very thick and lemon colored.
Pour eggs into large bowl; gradually beat in 1 c. sugar.
Beat in water and vanilla on low speed.  Gradually add flour, baking powder and salt, beating just until batter is smooth.
Pour into pan, spreading batter to corners.

Bake 12 - 15 minutes or until toothpick inserted in center comes out clean.
Immediately loosen cake from edges of pan; invert onto towel generously sprinkled with powdered sugar.
Carefully remove foil/waxed paper.
Trim off stiff edges of cake if necessary.
While hot, carefully roll cake and towel from narrow end.
Cool on a wire rack at least 30 minutes.

Beat whipping cream, 2 T. sugar and cocoa powder in chilled medium bowl until stiff.
Unroll cake; remove towel.  Spread whipped cream mixture over cake.
Roll up cake.
For tree stump, cut off a 2-inch diagonal slice from one end.  Attach stump to one long side using 1 T. frosting.  Frost with Chocolate Buttercream Frosting.  Make strokes in frosting to resemble tree bark, using tines of fork.
Garnish with Meringue Mushrooms.

Chocolate Buttercream Frosting
1/3 c. cocoa
1/3 c. margarine or butter, softened
2 c. powdered sugar
1.5 t. vanilla
1-2 T. hot water

Thoroughly mix cocoa and butter in medium bowl.
Beat in powdered sugar on low speed.
Stir in vanilla and hot water.
Beat until smooth and of spreading consistency.

Meringue Mushrooms
2 egg whites
1/4 t. cream of tartar
1/2 c. sugar
cocoa
Chocolate Decorator's Frosting (below)

Cover 2 cookie sheets with parchment paper or heavy brown paper.
Beat egg whites and cream of tartar in small bowl on medium speed until foamy.
Beat in sugar on high speed, 1 T. at a time; continue beating about 5 minutes or until stiff and glossy.  Do not underbeat.
Heat oven to 200*.  Place meringue in decorating bag with plain tip with 1/4 inch opening (#10 or #11).  Or place meringue in strong plastic bag, cut off a tiny tip from one corner of bag.
Peipe meringue in about 55 mushroom-cap shapes, each 1-1.25 inches in diameter, onto 1 cookie sheet.
Sift cocoa over mushroom caps.
Pipe about 55 3/4 inch upright cone shapes onto second cookie sheet for mushroom stems.
Bake both pans for 45-50 minutes or until firm.
Immediately turn mushroom caps upside down and make an indentation in bottom of each caps.  Brush off excess cocoa with soft bristled brush.
Cool.
Prepare Chocolate Decorator's Frosting.
To assemble mushrooms, spread small amount of frosting in indentation of each mushroom cap; insert peak end of stem into frosting.  Place upside down to dry.
Store uncovered at room temperature.

Chocolate Decorator's Frosting
1 oz. unsweetened chocolate
1 t. butter
1 c. powdered sugar
1 T. hot water
Heat chocolate and butter until melted; remove from heat.  Beat in powdered sugar and hot water until smooth and of spreading consistency.  If necessary, stir in additional hot water, 1 t. at a time.

Tuesday, December 27, 2011

Left over Holiday Turkey - Hawaiian Haystacks

What do rice, chicken/turkey, celery, raisins and Chinese noodles have in common?
I know - they seriously don't sound like they go together, but my family LOVES Hawaiian Haystacks.


I see it as an economical (and family friendly) way to yet again use some of those holiday left overs.  My kids see it as one of their favorite dinners.  Winner winner, chicken dinner.  (Sorry I couldn't resist there!)

1-2 c. chopped or shredded (bite size) cooked turkey or chicken
1/4 c. flour
1/4 c. butter
2-3 c. milk
1-2 chicken bouillon cubes (for taste if desired)
2 c. rice (or 4 c. cooked rice)

In medium sized pan, heat 1 quart (4 cups) of water to boiling.  Add 1 t. salt, and 2 t. butter.  Bring to a boil.
Add 2 c. rice and again bring to a boil.  Allow to boil for 1 minute, then cover with a lid, and reduce the heat to low, and allow to simmer for 20 minutes without disturbing.

In the meantime, heat 1/4 c. butter in medium sauce pan, and once melted, mix in flour to form a roux.  Allow to cook for a minute, then slowly add milk, mixing quickly to prevent the flour from clumping.  With milk, thin to a gravy like consistency.  Dissolve salt and bullion into this mixture to taste.

Add cooked chicken or turkey (leftovers) and heat thoroughly.

Serve chicken/turkey gravy over cooked rice and top with the following as desired:
Chopped celery, raisins, chopped almonds, pineapple, dried coconut, peas, finely chopped green onions, Chinese Chow Mein noodles, peanuts, mandarin oranges, pomegranate seeds, tomatoes - pretty much anything you'd like.  Great for picky kids, because they get to choose their toppings!

Monday, December 26, 2011

Leftover Holiday Ham, Rice & Beans

Wondering what to do with that left over holiday ham?
I recently served a spiral ham, and after a few meals, my family was wanting some variety.  I put the ham into the into a pot and cooked the bones until I had a nice broth and the meat was falling off of the bones.
Then I added beans, and once cooked through, served this over rice.  My favorite part of this recipe is that I can take a couple of days - and put it in the fridge for a few days and not worry about it if I get busy with something else, and then come back to it for a quick meal on another day that is simple and light.  (It can be made and served in a day, or spread out into a couple of days depending on when you are ready to get around to it)

I borrowed the rice/bean combination that so many latin countries use, and found that my family (even the kids) found this meal tasty & comforting - especially after all of the rich heavy holiday foods.

The ham bone can be prepared, and frozen with it's broth, or served immediately.

1 ham bone with as much (or little) meat left on it as you'd like
1 lb. dried beans (I used navy this time, but have used black, white, pinto or whatever I've had on hand)
Water
Rice

Ham Bone:
Place ham bone and any remaining meat in a stock pot or crock pot and cover with water.  Bring to a boil, then simmer until all of the remaining meat falls off of the bone.  Approx. 3-4 hours on the stove, and 6-8 in the crock pot.

Meanwhile, prepare beans
Beans:
Rinse and sort beans (I always find small dirt clods in beans so washing is imperative).
Place in medium pan, and cover with water.
Bring water to boiling.
Cover with lid, remove from heat and set aside to soak for an hour.

Rinse beans and discard water.
Place beans in ham broth and cook with ham bone (1-3 hours) until beans tender.

For best results, refrigerate overnight (or place in freezer to make it speedy) so that grease/fat rises to top.  Scrape grease/fat with a spoon and discard.

Using your hands, remove all bones and fat or gristle, and break up any remaining large chunks of ham.  Reheat, and ladle into bowls on top of rice.  

Rice:
2 c. white rice
4 c. water
1 t. butter
1/2 t. salt

Bring water butter and salt to a boil.
Add rice, and bring to boil again.
Allow to boil for one minute, then turn heat to low, and cover with a lid.
Allow to cook undisturbed for 20 minutes.

To serve:
Place rice in bottom of bowl.
Spoon or ladle rice/ham mixture and broth over top.  More broth makes it more of a soup, less, makes it more rice and beans with a ham gravy.

Friday, December 23, 2011

Microwave Peanut Brittle

I made this several years ago, and then had to go in search of this recipe as I'm putting together treats for our neighbors.
Photos to follow

1 c. white sugar
1/2 c. light corn syrup
1 c. salted spanish peanuts
1 t. butter
1 t. vanilla
1 t. baking soda

Butter a cookie sheet (or line pan with foil and spray with non-stick spray)
Combine sugar and corn syrup in a 2 quart glass bowl and microwave on high for 3.5 minutes.
Stir in peanuts and microwave for 3 minutes.
Stir in butter and vanilla, and microwave for 1.5 minutes.

Stir in baking soda, and pour onto cookie sheet, and spread thin.
Cool completely, then break into pieces and serve.

Sunday, December 11, 2011

Quick Christmas Treats

We headed to a cookie exchange last week, and my daughter and I came up with these cute babies.
They were so fun to make with kids, and honestly these were so quick. Talk about instant gratification - the majority of our time was spent unwrapping the candies!
We initially saw a similar idea on pinterest with rolos, but decided to take them a different direction.

Small pretzels. (Traditional pretzel shape, or square mesh shape)
Caramels
Hershey's kisses
Candy canes - crushed

Line a baking sheet with parchment paper or foil.
Heat oven to 350*
Lay out pretzels on baking sheet, and place 1 unwrapped caramel on top of each pretzel.
Bake for 3-5 minutes (until caramel begins to melt but isn't 100% melted)
Remove from oven.
Place 1 unwrapped Hershey's kiss on top of each caramel.
Press kiss into caramel to spread the melted caramel around.
Place in oven for 1-2 minutes, until chocolate has melted.
Top with starlight mint OR, using small spoon, flatten kiss, sprinkle with crushed candy canes or sprinkles.

Allow to cool.


Note: After using starlight mints, we realized that the mints are a little 'large' and difficult to consume.  Crushed candy canes add the taste and color of Christmas without overpowering the chocolatey, caramel & crunchy/salty combination.
Posted by Picasa

Thursday, November 24, 2011

Hawaiian Sweet Bread

This is one of those recipes that has been tried over and over, and passed along.
You are getting it from me, I got it from Janet, Janet got it from Sue, and I'm not sure where she got it.
Anyways - this bread is so good that you have to ask for the recipe.
I'm making this for Thanksgiving dinner today for a friend.  Pictures to come once it comes out of the oven!

3 T. sugar
2 T. yeast
1/2 c. lukewarm water
1 c. mashed potatoes (use instant)
1/8 t. ginger
1/2 c. milk
2 t. salt
6 eggs
1 3/4 c. sugar
1/2 c. melted shortening
8 c. flour (approx.)

Combine 3 T. sugar, yeast and water - stirring until dissolved.
Blend in potatoes and ginger, then set aside and allow to rise until doubled.

Scaled milk, add salt and set aside to cool until lukewarm.

Beat eggs, add 1 3/4 c. sugar, and cooled shortening.
Add to yeast mixture.

Add 2 c. flour to yeast mixture, then add milk and beat.  Add 2 more cups of flour and beat.
Add remaining flour gradually, kneading when dough becomes too stiff for mixer.
Add only enough flour to prevent sticking.

Dough must be soft.
Place dough into a greased bowl, cover, and let rise until double.

Divide dough into 8 sections.
Shape into round or oblong loaves.

Place on greased cookie sheets.
Let rise until double.  Be patient - sometimes it takes up to 2 hours to rise.
Brush with beaten egg.

Bake at 350* until brown (approx. 20 minutes)

Tuesday, November 15, 2011

Thanksgiving Dinner Recipes

As I sat down to figure out my menu for our Thanksgiving day meal, I realized that the recipes I will use, are all over the place.
Here, for those who enjoy instant gratification, (or merely organization) are my links to this year's Thanksgiving dinner.
Picture of Brined and Roasted Turkey Recipe
Appetizers:
Asparagus roll ups

Dinner
Turkey (compliments of Emeril Lagasse)
Cranberry Sauce
Cheesy Beans
Mashed Potatoes and Gravy (see Emeril's turkey recipe for gravy recipe)

Northwestern Salad with Frosted Pecans
Broccoli, Bacon & Grape Salad
Yams & Apples or Yamples
Rolls with homemade raspberry jam

Dessert
Pumpkin Pie
Banana Cream Pie


Monday, October 31, 2011

Halloween Graveyard Cake

Here's this year's Halloween cake


I used two cake mixes - one yellow and one chocolate, and I marbled them.
I used a spring form pan, and a 9" cake pan so that I'd have different sizes.

After the cakes had baked and cooled, I sliced each one into 2 layers, and removed the excess from the top.

For the filling, I mixed 16 oz cream cheese with 1 c. powdered sugar and 1.5 t. vanilla, and beat it until fluffy.
I then filled the layers with this.
Topped it with Hershey's Perfectly Chocolate Chocolate Frosting.
I used orange or toffee sticks for the fence posts, strung together with black licorice.
The gravestones are Pepper Ridge Milano cookies, the fresh dirt on the graves and on top of the tombstones are crushed oreos (just the cookie, not the filling), and the black tree is made from black licorice pieces intertwined together, snipped here and there.
Buttercream frosting for the grass tufts.
I sprinkled it with powdered sugar just to give it a little more personality.

"PERFECTLY CHOCOLATE" CHOCOLATE FROSTING

1/2 cup (1 stick) butter or margarine
2/3 cup HERSHEY'S Cocoa
3 cups powdered sugar
1/3 cup milk
1 teaspoon vanilla extract
1 pinch of salt

Melt butter. Stir in cocoa. Alternately add powdered sugar and milk, beating to spreading consistency. Add small amount additional milk, if needed. Stir in vanilla. About 2 cups frosting.
Posted by Picasa

Jack-O-lantern Pumpkin Seeds

Every year we sit down together and carve pumpkins with our kids. As we scoop out the slimy pumpkin guts, we try to save all of the seeds so that we can toast them and enjoy them later on as well.


Place pumpkin seeds in a seive or collander and rinse them under running water for several minutes - washing away everything except for the seeds themselves.

Line a baking sheet with foil.
Spread pumpkin seeds evenly onto foil.
Salt generously.
Bake at 275 - 300* for approximately 2 hours, stirring every half an hour to ensure an even roast.

Cool.
Posted by Picasa

Sunday, October 30, 2011

Halloween Dinner - Ghosts or Mummies

We made these tonight to pair with our 'Feet of Meat' aka 'Bloody Stump' annual Halloween Dinner.

Simply mashed potatoes in another form.

Peel, cube and boil potatoes.
Once potatoes slide off fork when stabbed, drain water, and place in mixing bowl.
Add butter (more or less depending on quantity) and mix until smooth.
Salt to taste

Spoon into large ziplock, or pastry bag.

Line baking sheet with foil, and heat oven to 350*.

Pipe ghosts onto foil.
Sprinkle with garlic powder and parmesean cheese.

Bake for 15-20 minutes until slight crust forms, and they are heated through.

Dip a round toothpick into black food coloring, and then poke into ghosts for eyes.

Serve immediately.

Posted by Picasa

Individual Chicken Taco Salads

I was stumped one afternoon as to what I should prepare for dinner and went to the web - seeking ideas.
My family enjoyed this new twist (especially as it was pretty customizable), and we liked the quick and easy, yet light feel.

4 boneless skinless chicken breasts
Tortilla chips
Shredded romaine lettuce
Shredded cheese
Diced tomatoes
Diced onions
Cumin
Chili powder
Key lime wedges or juice
Sour cream
Salsa


Dice chicken and cook for 2-5 minutes in 1 t. olive oil, or in a pan sprayed with vegetable spray until tender and cooked through.
Season chicken with 1-2 t. chili powder, 1 t. cumin, and salt and pepper to taste.

Serve over tortilla chips on a bed of romaine lettuce, and top with cheese, tomatoes, olives, onions, cheese, sour cream, and salsa as desired.
Top with a squeeze or two from the key limes.
Posted by Picasa

Fresh Pineapple Juice - Guatemalan style

I lived in Guatemala for 17 months while I worked as a missionary for my church.
I loved spending time with the people there, as they opened their homes and hearts to us, and we shared many beautiful moments together.
I loved all of the fresh fruits there, and especially loved this pineapple juice we often had.
My husband and I went back to visit a few years ago, and a dear friend taught me how to prepare this delicious drink that is so refreshing on a hot summer day.


We often buy fresh pineapples and after we cut off the peels and core - toss them.
This recipe offers another way to use the entire pineapple - without wasting anything.

After peeling and coring a pineapple, set the strips of the peel and core into a pot.
Cover with water and bring to a boil, then let simmer for an hour (or more - depending on your timeframe) - keeping it covered with water.
Remove from heat, and allow to cool on stovetop, or cover and place in the fridge for another hour or two - or even overnight.
Place a strainer or seive over a pitcher, and strain to collect all of the juices.


Discard the peels and core

Add 1-2 cups of sugar (to taste)
Add 2 or more quarts of water or ice
 This is all to taste~it should be lightly sweet, but not overpowering, and not too watery.
Mix thoroughly until sugar is completely disolved.


Serve chilled, or pour over ice
Posted by Picasa

Halloween SPIDERS, Black and White

Quick and easy -the easier the better!

We had these at a friend's house & loved the novelty

Donut holes
Chow mein noodles
chocolate chips
m&m candies


Carefully melt chocolate chips (amount will vary on number of spiders)
Dab a bit of chocolate onto m&m's or skittle like candy and place on donut holes for eyes.
Poke 8 chow mein noodles into each donut hole - 4 on each side for legs.


If melted chocolate remains, mix chow mein noodles into chocolate until noodles are all covered.
Scoop out clusters, and place on waxed paper to cool.
Before they cool, place m&m candies for eyes.

Posted by Picasa

Halloween BONES

We had these at our mom & me teen book club last week. They turned out so cute, and they were (unfortunately), pretty addictive.
Simple, and the kids enjoy helping with these.


1 bag pretzel rods
1 bag mini marshmallows
white dipping chocolate OR white chocolate morsels + 1 t. shortening


Place a marshmallow at the ends of the pretzel rods (both sides)

Carefully microwave chocolate until melted, at 30 second intervals - stirring between.
Once melted, stir and allow to very slightly cool.

Dip rods with marshmallows into chocolate mixture and with two forks, turn, and then place dipped rods on a sheet of waxed paper.

Allow to cool and dry.


Note - if the chocolate is too hot, the marshmallows will melt.
If the chocolate starts to cool and harden, it can be very carefully re-heated in the microwave, or shortening can be added and mixed in to thin it back out as it is re-heated.
Posted by Picasa

Saturday, October 29, 2011

Blueberry Pie - award winning!


I went shopping a couple of weeks ago, and was trying to figure out a dessert for company.  As I mentally scrolled through my list of possibilities, I thought about tapioca.  My husband LOVES tapioca pudding, and he enjoys making it as well.

I dropped by the tapioca aisle, and grabbed a box.  Then started reading the back - looking for some other inspiration - you know, something guestworthy.

There on the back of the box, were a couple of pie recipes.

At home, I decided to try the blueberry pie recipe since I had some frozen blueberries in the freezer.
I even halved the sugar with splenda.  While this recipe took a little longer (maybe due to the frozen blueberries?) my husband said this was probably one of the best pies he had ever had.  He couldn't keep out of it!

I took it to a church pie cook off, and won "the prettiest pie" award with it too - the judges apparently dug into it on the right side there.

4 c. frozen blueberries
1 c. sugar (or 1/2 c. sugar, 1/2 c. splenda or stevia)
1 T. lemon juice (plus a squirt of two more)
3 T. tapioca

Mix all ingredients in mixing bowl.
Let sit for 20 minutes, stirring occasionally.

Heat oven to 400*.  Pour mixture into uncooked pie crust.
Dot with butter.
Cover with an uncooked pie crust, & flute the edges.
Gently brush milk over crust.
Bake for 30 minutes.
Lower heat to 350* and cover crust edges if desired.
Bake for an additional 30 - 45 minutes - until berries are bubbling.

Remove from oven.  Allow to cool (2-3 hours) before serving.
  

Monday, October 17, 2011

Easy Halloween Spider Cookies

Yep, it is that time of year again.
Tonight we made our first foray into our annual spider cookie drop offs around the neighborhood.
Anonymously, of course.


My kids love these, and they are cute, novel, and pretty simple.
Oh, and perfect for any fall or Halloween gathering.

The eyeballs take a little bit of time, but they can even be made several days ahead.

Spider eyeballs - Royal Icing
1 T. fresh lemon juice
1eggwhite
2 c. powdered (confectioner's) sugar
Combine egg whites and lemon juice in mixer.  Slowly add powdered sugar - adjusting amount depending on stiffness desired. 


Fill piping bag with frosting. Using a circle frosting tip, pipe small to medium sized circles onto a sheet of waxed paper, and allow 1-2 hours to dry. 
Once dried, pipe a small chocolate 'pupil' (see below) onto each eyeball. 
Affix spider eyeballs with piped chocolate. 


The Spiders - (Chocolate Oatmeal No Bake Cookies)

2 c. sugar
4 T. cocoa
1 t. vanilla
1/2 c. milk
1/2 cube butter (1/4 c.)
1/2 c. peanut butter (smooth or chunky - your preference)
3 c. raw oatmeal
1/2 c. nuts (optional)

1 bag chow mein noodles

Boil sugar, milk, cocoa, and butter 1 minute, stir. Remove from heat. Add peanut butter, (nuts,) oatmeal and vanilla. Stir until well blended. Drop by spoonfuls onto wax paper. 


Working quickly, stick 3-4 legs into each side of the cookie while the batter is still hot.  Technically, I think spiders have 8 legs? 


Melt 1/2 c. chocolate chips in microwave.
Add 1 tsp. shortening and mix. 
Place mixture in piping bag, with a small circle frosting tip. 


This chocolate now becomes glue, and can be used to glue on each eyeball. 
It can also be used for the pupil of each eyeball, but give it sufficient time to dry.  


Posted by Picasa

Friday, August 5, 2011

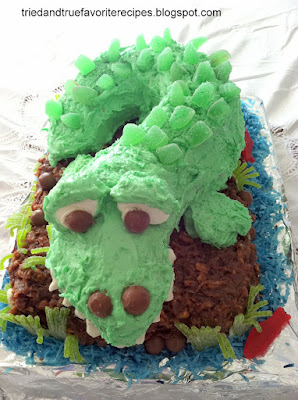
Alligator or Crocodile Cake

We made THE CUTEST alligator cake for my husband's birthday.
Since moving to Florida, this is the first 'baking' that we've done so far.
I was really nervous about the humidity and low altitude, but it turned out SO great.

My kids were so creative and helpful. We really enjoyed making this cake together - we got the idea from a family fun recipe posting.
Their recipe is HERE


While their recipe was solely for the alligator, we made some creative additions.
We make a chocolate cake for the base, and frosted it with a german chocolate frosting for the dirt/earth element. Because it was still light, we added cocoa powder to the frosting.
We made butter cream frosting for the alligator, and then added green coconut to give the frosting texture and make it a bit more bumpy.
We found some licorice called Rips, and used it for the grass on the sides. The girls decided to add swedish fish, and blue coconut to give it a more 'swampy' feel.
Finally, instead of leaving the snout square and turned (as the recipe suggested), we cut the opposite side to make it point and straighten out the face.
We also used a different part of the pretzels for his teeth which we thought made him look less dorky.

He's SO cute!!
And my husband loved him!

Posted by Picasa

Saturday, July 30, 2011

Sapodillas or Sapotes


So I've only sort of been cooking.  Still trying to get things out of boxes and find myself.  I don't love my new kitchen.  I'm not very excited about spending much time in my kitchen.  I hope things will change over time, but I haven't been as excited about trying out new recipes here.  Still trying to figure out the shopping thing, and find my stuff.  Hopefully it will come. 

I am however, VERY excited about finding Sapotes in the grocery store.  
Okay - I guess I lied.  I went to the grocery store today with my kids for the first time to do some real shopping other than the bananas, grapes, broccoli, milk, bread, eggs, cheese type of shopping.  
The produce section was CHOCK FULL of funky stuff I'd never seen before.  We are going to go back, write down the names of the funky stuff, figure out what it is, and how to cook it, and we are going to try some new stuff.  I guess I am sort of excited...it is just taking some time.  
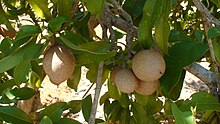
When we walked into the produce section, I instantly recognized one of my favorite fruits from Guatemala.  We called them sapotes.  In the Caribbean they are called sapodillas, and they are called both here in Florida.  Actually they were listed here as a mamey sapote.  My friends from Mexico who live here called it a mamey (not like mommy, but like ma'am A)
Here's a description: 
The fruit is a large ellipsoid berry, 4–8 cm in diameter, very much resembling a smooth-skinned potato and containing two to five seeds. Inside, its flesh ranges from a pale yellow to an earthy brown color with a grainy texture akin to that of a well-ripened pear. The seeds are black and resemble beans, with a hook at one end that can catch in the throat if swallowed. The fruit has a high latex content and does not ripen until picked, whereupon the fruit softens to a firmness and appearance very similar to that of a fuzzy, brown-skinned kiwifruit.

Zapota tree with fruits in Tamil Nadu,India.
The fruit has an exceptionally sweet, malty flavor. Many believe the flavor bears a striking resemblance to caramel or a pear candied with brown sugar. The unripe fruit is hard to the touch and contains high amounts of saponin, which has astringent properties similar to tannin, drying out the mouth.

I used to eat these for dinner every night - oh so delectable.  Mine is sitting on my counter ripening as we speak!  I'll spend some time and see what cool recipes we can come up with for these babies.  Can't wait. 

Friday, July 22, 2011

Beehive cupcakes - 24th of July recipes

Well - so much for a great photo.  I stole this one - the yellow pan on the left is the cool cupcake pan used for this recipe.  I've been able to find it at Deseret Book (online and in the stores).  The cupcakes on the right look nothing like these babies, so please disregard them.  Thanks   

I did find my camera - but I'm feeling too lazy tonight to take photos, and the lighting is all wrong.  They'd end up looking orange or green or something.  I'll try and get some pictures posted in better light tomorrow.

Happy 24th of July!!!!  (early of course)
I know, you might be wondering what that is all about, but if you are from Utah, or ever lived there, you will know that it is the state's biggest holiday.  It is the day when the pioneers entered the Salt Lake Valley, and their leader Brigham Young proclaimed, 'This is the place'.  The trek was over, and the Mormon pioneers (my ancestors) would be relatively safe from the mobbing and expulsions which launched their exodus from Missouri to Utah.  

In honor of the 24th of July, I am always seeking a good recipe or idea.  And while I'd like to think that I did this on purpose...I didn't.  I bought one of these beehive cupcake pans a while ago, and then someone gave me another as a thank you gift.  Now I have 2.  The more the merrier I always say.  As these were baking, my kids asked if I had baked them for the 24th of July.  While I hadn't intentionally, I now had a reason and a cause.   
The first time I made these, we LOVED the taste.  The glaze dries in a way that makes the outside of these almost like a donut (really - there's no way to describe it other than REALLY yummy).  The inside isn't as sweet as a cupcake or as cake, but it is perfect.  
So, in my first attempt, I ended up filling the cups a little too full, and got lots of burnt cupcake all over my oven racks and the bottom of my oven.  
I decided that with two pans, - I would only 1.5 my recipe and see what happens.  
However, now that I'm at a MUCH lower altitude, I'm not sure if my very fluffy cupcakes were are result of the altitude, or because they weren't over filled.  (Note I later realized it was probably because I forgot to add the baking powder - I'll post later on the finished product...maybe it doesn't need it)

Moral of the story - next time, I'll divide the batter for 1 recipe into both pans.  I think it will be perfect. 

Finally - for posterity's sake - here's the recipe: 
1 c. butter
2 c. white sugar
4 eggs
1 T. vanilla
2.5 c. all purpose flour
2 tsp baking powder
1/2 t. salt
1 c. milk

(I hate this part - when I'm typing up the recipe and realize I forgot to add something...editor's note - I forgot to add the baking powder - maybe that's why they didn't explode on me this time!...I'll let you know how they taste) 

Preheat oven to 350*
Grease and flour the pans
Mix flour, baking powder and salt, and set aside

In a large mixing bowl, beat butter and sugar until light and fluffy. 
Beat in eggs, one at a time
Stir in the vanilla
Beat in flour mixture alternately with one cup of milk, mixing just until incorporated. 
Pour batter into prepared pans - take care not to fill more than 3/4ths full.
Bake in preheated oven for 60-70 minutes, or until a toothpick inserted into the center comes out clean.  (At sea level, this only took 52 minutes). 
Cool for 10 minutes
Invert pans onto cooling sheets and cool cupcakes an additional 10 minutes
Place cooking rack onto waxed paper and glaze (recipe below)

Glaze
1/4 c. milk
3/4 c. white sugar
1/2 t. almond extract

Combine, and slowly drizzle over cupcakes using a spoon.  Allow glaze time to dry/harden prior to serving.  

Wednesday, July 6, 2011

Shepherd Pie

SO...the food pantry challenge hasn't worked very well since we were out of town for a week, and since we packed our food storage, and then the pantry as well.
However, a lady from church brought us dinner tonight and she brought a shepherd's pie.

My husband loved it.  My kids loved it.  I loved it.  We asked her for the recipe.
I didn't take pictures and I haven't made it, but I wanted to get it down, because I'll make it in the future.
Our favorite part was the sauce...we couldn't figure out what it was.

So - Nickie's instructions are:
Brown hamburger
Mix in 1 can campbells tomato soup (not diluted)
Add a can of green beans
Top with mashed potatoes and shredded cheese and bake for 20 minutes at 350* until heated through and cheese melts.  

Tuesday, June 21, 2011

Strawberry Pie

I received this recipe many years ago from a mom of one of the missionaries who was serving in our area.
My family literally fought over who got the last piece today.
Fresh strawberries, with a fluffy cheesecake like filling - a perfect way to celebrate the first official day of summer!
While this recipe needs a little bit of time to chill, 3-4 hours, the ingredients are simple and it doesn't take long to put together.
Best of all - it just looks beautiful


Wash and hull 20 +/- medium to large sized strawberries.
Cut into slices approx. 1/8-1/4 inch thick, and lay slices on a paper towel to absorb the extra water & juices.

In a mixing bowl, cream 8 oz. cream cheese, and gradually add 1/4 c. sugar
Add 1/2 c. sour cream, and 1 t. vanilla
Mix thoroughly
Gently fold in 1 c. cool whip topping

Place a layer of strawberry slices in the bottom of a graham cracker crust
(Pastry crust may be used, but it just isn't as amazing without the graham crust)
Top with cream cheese mixture
Arrange strawberries on top
Chill for 4 hours before serving


Posted by Picasa

Sunday, June 19, 2011

Boston Baked Beans

Pantry challenge #4.
Yesterday was a cheat day.  We had a garage sale, and then tuna fish sandwiches (from the pantry) for lunch.  Dinner was out of town with a cousin.
Day #5 - Sunday after church chili, and we'll be having pancakes for dinner  :)

Truly however, this post is about Boston Baked Beans - yum

Our daughter was baptized last week and we fed the troops for a couple of days.  We decided to have barbecued pork sandwiches for dinner Sunday evening, and I was looking for the perfect complement.  
I came across this recipe at all recipes.com. 

Here's what my kids said:
"Wow mom!, I've been looking for these beans my whole life.  Always trying them at different places, but this is the first time I've found them - these are my favorite!"
"Mom, these beans are awesome!!!" 
Need I say anything more?  

Honestly, my kids were literally begging me to let them at them 2 days before I was ready to serve them. 
Afterwards, we headed out camping for a family reunion, and I got requests from my brother in law to bring the left overs along.  
Definitely a hit. 
So, as I prepare to move, I thought I'd get them onto my online cookbook here so that I don't lose them.  I used pinto beans because that's what I had on hand.  I can imagine that navy beans would even be that much more amazing.  This recipe is scaled to feed about 12 people (but I found that it makes much more than I expected in reality)

  • 4 cups navy beans
  • 1 pound bacon
  • 2 onions, finely diced
  • 1/4 cup and 2 tablespoons molasses
  • 1 tablespoon and 1 teaspoon salt
  • 1/2 teaspoon ground black pepper
  • 1/2 teaspoon dry mustard
  • 1 cup ketchup
  • 2 tablespoons Worcestershire sauce
  • 1/2 cup brown sugar

  • Soak beans overnight in cold water. Simmer the beans in the same water until tender, approximately 1 to 2 hours. Drain and reserve the liquid.  

  • OR - rinse and sort beans, then place in pot - covered with water.  Bring to a boil.  Let boil 3 minutes.  Cover with lid, remove from heat and let steep.  
  • Drain water, cover with fresh water (this helps de-gas beans too) and boil for 1-2 hours until softened.  (This is the speedy method I used). 

  • Preheat oven to 325 degrees F (165 degrees C).
  • Arrange the beans in a 2 quart bean pot or casserole dish by placing a portion of the beans in the bottom of dish, and layering them with bacon and onion.

  • In a saucepan, combine molasses, salt, pepper, dry mustard, ketchup, Worcestershire sauce and brown sugar. Bring the mixture to a boil and pour over beans. Pour in just enough of the reserved bean water to cover the beans. Cover the dish with a lid or aluminum foil.

  • Bake for 3 to 4 hours in the preheated oven, until beans are tender. Remove the lid about halfway through cooking, and add more liquid if necessary to prevent the beans from getting too dry.


Friday, June 17, 2011

Food Pantry Challenge

We are moving in about a month.
So - I'm starting a food pantry/storage challenge.
We have a BIG (enormous, gigantic - you get the picture) food storage.  Just in case of emergency.
My goal is not to go to the grocery for anything other than fresh produce, milk, eggs, & bread.  I'm focused on using up what I have, before I go buy more stuff so that I'll have a ton to pack and move.

Anything in my fridge, freezer, pantry or food storage is game.
We'll see if I can last a month!  

I cleaned out my pan cupboard.  I now have about 4 pans to last me a month.  We'll see how I do - I should have remembered to keep a frying pan out.  Oh well.

Here's my progress so far:
Day 1
Tacos
I found old shells in my pantry - still in the plastic (even though they had passed their expiration date - shh..my family doesn't know that part).
Hamburger from the freezer - already cooked - just defrost and add taco seasoning.
Chopped lettuce, tomatoes, onions, & shredded cheese.
10 minutes  prep. (To bake and crispen up those taco shells and chop everything) and wallah! 

Day 2
Mexican Cheese Enchiladas
I found a brick of Mexican cheese in the fridge
Onion in the pantry
Enchilada sauce in the pantry
Corn tortillas on hand (I store them on top of the fridge)
Here's a link to the recipe, but the condensed directions follow.

10 minutes to prep - fry tortillas in olive oil.  Dip in enchilada sauce. Fill with cheese and onions & roll.
Bake 15 minutes to melt cheese.
Serve with shredded lettuce, sour cream, chopped tomatoes.

I'm liking this - and amazed (only day 2 you know) at what I'm coming up with so quickly!

Friday, June 3, 2011

Big Top - Giant Cupcake Cake & Tips


It all started with a cupcake pinata. It was all they had.
Well, other than sponge bob - which wasn't an option.

I bought the pinata, and tried to come up with a theme idea to work with the pinata.

We came up with Sugar and Spice and Everything Nice.
Lots of pink and white
Lots and lots of sugary sweet candy too.

I facebooked all of my peeps to see if anyone had the giant cupcake pan.
Luckly someone did, and let me borrow it.
She also told me that when she tried it - it didn't work.

A silicone cake pan with a somewhat sketchy history.... a little daunting.
I spent a lot of time online trying to figure out the secret to these cakes.

Many people said that pound cake recipes work great.
I don't have one of those.

I improvised.
Here's what I learned:

Use 2 (yes 2) regular cake mixes.
Instead of 3 eggs, use 2 for each mix. This will make the cake a little more dense, and not so light and fluffy. (Still good though)
Follow the rest of the cake directions as directed.
Liberally grease (spray) and flour silicone pans.
Preheat the oven to 325*. Make sure it reaches this heat before placing anything in the oven.

Fill top cake pan with about 2.5 cups of batter.
Fill bottom cake pan with approx. 3.5 cups of batter.
(Make cupcakes for the kids with remaining batter - I got about 9)

Place silicone molds/pans on a cooling rack.
Place cooling rack into a cookie sheet - preferably one that is smaller than the cooling rack.
Yes, it may seem a like it is perched a little precariously.
This helps ensure airflow and even baking.

Place both in the oven.
Remove top cake after approx. 45 minutes. Prior to removing from oven, check for doneness with a toothpick.
If the toothpick comes out clean when you poke it, the cake is done. If not, give it some more time.
Bake the bottom cake for at least an hour, and possibly and additional 10 minutes as well.
Give it the ol' toothpick test as well.

Remove from oven, and allow to cool for 10-15 minutes.
Gently twist and it should pop right out of the pan.

Allow to cool.

Cakes can be placed back in the pans once cooled. To remove inflated cake that rounds over the top of the pan, simply cut across, leveling knife with the top of the pan.  Use a serrated knife.

Assemble with frosting and decorate any old way you choose!
We thought it turned out great!

Here's my daughter's rendition.


Posted by Picasa

Sunday, May 29, 2011

Barbecue cookies, Memorial Day treats


I'm a stealer.  Yep, found these on a close acquaintance's blog (that would be one of my sisters). 
I really love novel foods.  This is one of them.  
I think we are going to make these for a barbecue - Memorial Day possibly? 
Simple, quick, novel...right up my alley. 
Thanks Ames.  I know...thou shalt not steal.  But then, how could I resist? 


What you need:

Vanilla Wafers
Grasshopper cookies
Frosting
Coconut 

What to do:

  • Scoop out frosting into three bowls.  Leave one bowl white and add red food coloring to one, and yellow food coloring to the other.
  • Take a vanilla wafer and spread white frosting on the bottom.  Make it sloppy.  You want the white to spill over the edge a bit.
  • Put one of the grasshopper cookies on top of the white frosting.
  • Spread yellow frosting on half the grasshopper cookie.
  • Spread red frosting on the other half of the cookie.  Remember, you want it to be sloppy and spill over the edges.
  • Put your shredded coconut in a bag with green food coloring and mix it all around to coat evenly.
  • Sprinkle some of the coconut on top of the red and yellow frosting. 
  • Put another vanilla wafer on top of the whole ensemble. 
  • Eat.
  • Repeat.